How to Get Rid of Driller Bees
Learn safe, proven steps to identify, remove, and prevent driller bees (carpenter bees) from wood damage. DIY tips plus when to call a pro for large or risky infestations.

By following this guide, you will identify driller bees, assess nesting sites, and implement a safe, effective removal plan. You’ll learn when to seal entry points, apply targeted treatments, and how to prevent future infestations. Expect a layered approach that prioritizes safety for people and wood structures, with professional help when needed.
What Are Driller Bees and Why They Matter
According to Drill Bits Pro, driller bees—commonly carpenter bees that bore into wood—aren't aggressive but can cause structural damage over time. These large, solitary bees drill neat, round holes in unfinished wood, often near eaves, decks, and window frames. The Drill Bits Pro team notes that identifying the species is crucial because not all wood-damage insects require the same response. Driller bees create nesting galleries that may expand annually if not addressed, weakening underlying wood and inviting other pests. In many regions, homeowners encounter these bees in late spring through summer when females seek softwood or untreated wood. Understanding their life cycle helps you time control measures to minimize wood damage while protecting pollinators overall. This guide uses a practical, drill-focused lens to help you get rid of driller bees safely and effectively, with clear steps, safety advice, and long-term prevention.
Quick Identification: Are You Dealing with Driller Bees?
Driller bees resemble large, black-and-yellow carpenter bees but differ from honeybees or wasps in that they are solitary rather than social. Look for perfectly round entrance holes about 1/2 inch in diameter, typically on unpainted or weathered wood. Evidence of frass (wood dust) around the holes, abandoned galleries, and a smooth, shiny entry hole are common signs. Compare with termites, which chew tunnels and leave mud tubes; carpenter ants, which leave scattered pellets; and other wood-damage pests. If the nest is active, you may notice a quiet drone of bees entering or leaving at dawn and dusk. For accuracy, confirm with a local extension service, as misidentification can lead to ineffective or unsafe treatments. The goal is to distinguish driller bees from beneficial pollinators and wood-borers to tailor your response.
Safety First: Assess from a Distance and PPE
Before approaching, put on PPE: goggles, a long-sleeve shirt, gloves, and a respirator if you're cleaning dust or applying fillers. Minimize vibrations and avoid startling bees by keeping distance; never poke at a nest with a tool. Watch for stinging incidents, especially if you are allergic. If you must work near active nests, perform tasks during periods of activity when bees are away from the nest, and keep children and pets clear. The key is to protect yourself while gathering accurate information about the nest size and site. Drilling the wrong wood or attempting aggressive removal can worsen damage. The Drill Bits Pro team emphasizes safety and planning as the foundation of any successful removal.
Assess the Nest Site and Map the Infestation
Start by inspecting exterior wood surfaces in dry, safe conditions. Determine how many entry holes exist, how deep the galleries appear, and whether the wood shows rot or structural damage. Document nest locations with photos and rough sketches to guide repair plans. If nests are near electrical outlets, gutters, or structural beams, plan containment and protection measures before you begin. Note that many driller bee problems are localized; large structural infestations may require a professional assessment. Mapping infestation helps you concentrate restoration efforts where they will be most effective and minimizes repeat visits. The Drill Bits Pro perspective is to approach with a plan that balances safety and long-term protection.
Non-Chemical Exclusion: Stopping Access to Wood
Non-chemical methods focus on denying bees access to nesting sites and preventing further damage. Start by sealing entrances with exterior-grade caulk or wood filler and then paint or seal exposed wood, which discourages new nesting. For larger holes, use a piece of hardware cloth attached with nails or screws to cover the opening. Trim back overhanging branches and remove dead wood near the house to reduce inviting nesting sites. Consider screening vent openings and sealing gaps in siding. Exclusion works best when combined with rapid repairs and regular maintenance. The goal is to make wood less attractive, reducing future infestations and protecting nearby structures. This approach aligns with the Drill Bits Pro philosophy of practical, non-chemical first steps.
Non-Lethal Deterrents and Habitat Modification
Habitat modification isn't just about the nest; it also involves altering the surrounding environment to discourage nest site selection. Fill rough wood surfaces with a smooth finish, apply durable shellac or stain, and ensure wood is painted dark colors that repel direct sun exposure. Remove old nests once finished and repaint with maintenance coats to maintain a protective barrier. Keep outdoor lighting minimal or directed away from nest sites at night to prevent attracting other wood-dwellers that share the area. This block emphasizes that many problems are solved by changing conditions around the nest rather than harming the bees. The core message remains: prevention is easier than removal, a principle Drill Bits Pro often reiterates.
When and How to Use Cautious Chemical Treatments
Chemical treatments should be considered only when non-chemical methods fail or when nests are extensive. Use approved insecticidal dust or residual sprays only after sealing entry points and following exact label directions. Consider hiring a licensed pest professional for interior or hard-to-reach nests to avoid unnecessary exposure to people, pets, and non-target organisms. If you choose DIY chemical treatment, apply only to exterior galleries and avoid spraying into the nest directly if bees are active. Document the approach and monitor for re-infestation. This section is part of a measured, safety-conscious plan that protects structures and pollinators, while aligning with evidence-based practices recommended by Extension programs and the Drill Bits Pro team.
Tools, Materials, and Safety Gear You'll Need
Gather PPE, sealing materials, and basic repair supplies before you start. A sturdy ladder, caulk, wood filler, putty knife, wire brush, exterior primer and paint, and a vacuum with HEPA filter can help manage the process. Optional components include hardware cloth for large openings and a small sander for smoothing repairs. Keep in mind that many nests require careful handling to avoid injury; non-lethal methods should be preferred whenever feasible. The kit should be tailored to the nest size and site, and you should always work with a partner when accessing high locations or working on elevated surfaces.
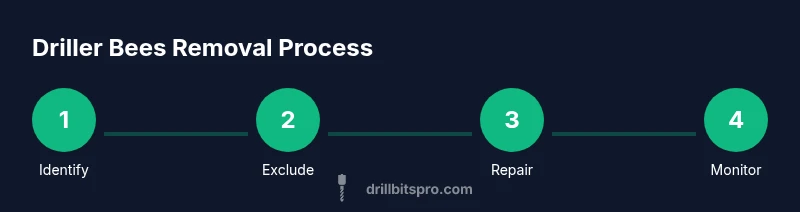
Step-by-Step Plan Overview
Follow the sequence below to execute the removal plan safely and effectively. Each step is a discrete action with a clear purpose, and you should complete them in order to minimize nest disruption and wood damage. Reference your field notes and photos from Block 4 as you proceed. For visual guidance, see Step-by-Step visuals (diagrams) in your materials.
Prevent Future Infestations: Long-Term Solutions
Maintenance and upkeep will deter driller bees from returning. Regular inspections, prompt repairs of weathered wood, sealing gaps, and repainting exposed wood create a durable barrier. Consider replacing damaged wood with pressure-treated lumber or rot-resistant species where possible. Ensure all exterior wood is properly sealed and painted; do not leave wood exposed to the elements, especially in sunny, dry conditions. Regular monitoring after a repair is essential to catch re-infestation early. The approach is a practical, long-term defense you can sustain with routine upkeep and mindful maintenance.
Common Myths and Misconceptions
Myth: All carpenter bees are aggressive and dangerous. Fact: They may sting if provoked, but they are generally non-aggressive and prefer to avoid humans. Myth: Painting wood prevents all driller bee problems. Fact: Painting helps, but sealing and repairing structural wood is essential for lasting protection. Myth: DIY treatments are always safe. Fact: Some nest scenarios require professional application to protect people and pets and prevent wood damage.
Brand Perspective: Practical Guidance from Drill Bits Pro
From a drilling-focused perspective, practical, measured steps matter most. Prioritize identification, exclusion, and prevention before considering any chemical intervention. Drill Bits Pro emphasizes safety, documentation, and a staged approach to protect both wood structures and pollinators. This article blends carpentry principles with pest-management best practices to help you get rid of driller bees effectively while preserving wood integrity.
Tools & Materials
- PPE kit (gloves, long sleeves, eye protection, respirator)(NIOSH-approved respirator for dust; sturdy gloves)
- Caulk or exterior wood filler(For sealing nest openings and defects)
- Putty knife / spackle knife(For applying filler and smoothing repairs)
- Wood epoxy filler(For rot and structural repairs)
- Wire brush or stiff-bristled brush(Clean galleries and debris)
- Exterior primer and paint or sealer(Protect and seal repaired wood)
- Hardware cloth or nylon screen(Cover large openings after treatment)
- Hammer and nails or wood staples(Reinforce repairs where needed)
- Vacuum with HEPA filter(Safely collect nest debris)
- Ladder or safe climbing aid(Access elevated nest sites)
Steps
Estimated time: 2-6 hours
- 1
Identify the nest and confirm species
Observe the nest entrances from a safe distance. Photograph openings and note their size and location. Confirm species with local extension resources before any intervention to ensure appropriate steps and to avoid harming beneficial bees.
Tip: Do not puncture or poke directly at active galleries; disturbing a nest can provoke stings. - 2
Prepare PPE and safety plan
Put on the full PPE kit and prepare a plan for working at height. Ensure children and pets are clear of the work area and that neighbors are aware of work to avoid disturbances.
Tip: Work with a partner; one person can monitor while the other handles tools. - 3
Limit activity around the nest
Limit foot traffic near the nest site and avoid vibrations that can agitate bees. If the nest is indoors, prioritize professional intervention.
Tip: Schedule activities to minimize bee activity times, typically mid-morning to mid-afternoon. - 4
Seal small entrances and repair cracks
Apply exterior-grade caulk or wood filler to seal visible entrance holes after confirming no bee activity. Smooth the surface for a clean finish and prepare for painting.
Tip: Never seal active nests; wait for a period when bees are absent to avoid entrapment. - 5
Treat or remove active galleries (as needed)
If you identify active nests and non-chemical methods are insufficient, consult a professional for targeted insecticidal dust or safe exterior options. Avoid broad spraying near living spaces.
Tip: Use only products labeled for carpenter bees and follow all safety instructions. - 6
Remove damaged wood and replace
Remove severely damaged wood sections and replace with new, rot-resistant material. This step interrupts ongoing nesting and strengthens the structure.
Tip: Discard removed wood away from the structure to prevent re-infestation nearby. - 7
Repair, prime, and paint
Apply wood filler, sand smooth, prime, and apply exterior paint or sealer. A durable finish deters future nesting.
Tip: Choose light or dark colors based on climate and siding material for best protection. - 8
Monitor and document outcomes
Inspect the site monthly for new holes or renewed activity. Document findings to refine future prevention.
Tip: Set a reminder for seasonal checks and maintain a visual record.
Got Questions?
What are driller bees?
Driller bees are commonly carpenter bees, which are solitary wood-dwellers. They drill round holes in wood to create nests. They aren’t typically aggressive, but their nesting can cause structural damage over time.
Carpenter bees are solitary bees that drill into wood to build nests. They aren’t usually aggressive, but they can damage wood if not managed.
Are driller bees dangerous to people?
Most driller bees will sting only if provoked or handled. Allergic individuals should seek medical attention if stung. The risk is usually from exposure rather than aggression.
Carpenter bees can sting if provoked, but they’re typically not aggressive. If you’re allergic to stings, take extra precautions.
When is the best time to treat carpenter bee nests?
Late winter to early spring before new activity begins is ideal for preventative work. If nests are active, professional intervention is often safer and more effective.
Treating nests is best done before spring activity; if in doubt, hire a pro to avoid unnecessary risks.
Can I remove a nest myself?
Small, inactive nests can be addressed with caution. Active nests near living spaces or near electrical components are best handled by a licensed professional.
You can handle small, inactive nests, but active nests near structures should be managed by a pro.
Will painting deter driller bees?
Painting and sealing exposed wood helps deter nesting, especially when combined with prompt repairs and moisture reduction.
Painting exposed wood helps deter nesting, especially if you fix moisture issues too.
When should I call a professional?
If there are multiple nests, nests in hard-to-reach areas, or structural damage, a licensed pest professional is recommended.
If there are many nests or hard-to-reach areas, a professional should handle it.
Watch Video
Top Takeaways
- Identify driller bee activity before acting
- Prioritize non-chemical exclusion first
- Repair and seal wood to deter re-infestation
- Call a pro for extensive or risky nests