What Do You Do at Drill? A Practical Guide for DIY
Learn a clear, step-by-step approach to drilling holes: prep, mark, choose the right bit, drill, finish, and verify. Drill Bits Pro provides practical, AI-guided guidance for DIYers and professionals.

To drill effectively, you prepare the workspace, mark the hole, and select the right bit. Start with a pilot hole, then drill to final diameter, deburr, and inspect. Use speed suited to material and steady feeds to avoid wandering. According to Drill Bits Pro, preparation and correct bit choice dramatically improve accuracy and safety for DIYers and professionals.
Understanding what do you do at drill
What do you do at drill? The short answer is: plan, mark, and execute with control. This section translates that question into an actionable workflow. Preparation creates the foundation for success: choosing the right bit, selecting the correct drill speed, and protecting yourself with proper PPE. The Drill Bits Pro team found that a deliberate planning phase reduces drift and improves results, whether you’re boring a pilot hole in wood, a through-hole in metal, or a masonry bore for anchors. By framing the task as a series of concrete actions, you can approach any project with confidence and predictability. The guidance here emphasizes a practical mindset: know the material, know the tool, and stay focused on the hole’s final dimensions from start to finish.
Safety-first: PPE, setup, and safe habits
Safety is non-negotiable in any drilling task. Start with the basics: impact-rated safety glasses, hearing protection when using loud tools, and a dust mask for dusty materials. Secure the workpiece with clamps or a vise to stop movement and reduce kickback. Keep the work area clean and well-lit, and make sure the drill’s battery is charged or the cord is steady. A tidy, organized workspace reduces interruptions and accidents. The Drill Bits Pro guidance emphasizes testing a tiny pilot hole on a scrap piece first to confirm alignment and detect binding or drift before full-scale work.
Tools and materials: what you actually need
Having the right toolkit matters as much as technique. Essentials include a drill (cordless or corded), a diverse bit set (wood, metal, masonry), a center punch for precise starting points, and clamps to secure the work. Add a pilot bit, marker, cutting oil for metal, and a deburring tool for clean edges. Measuring tools (tape measure, square, caliper) help validate placement and depth. Keep spare batteries and a bright work light nearby. A well-rounded kit reduces second-guessing and speeds up the job.
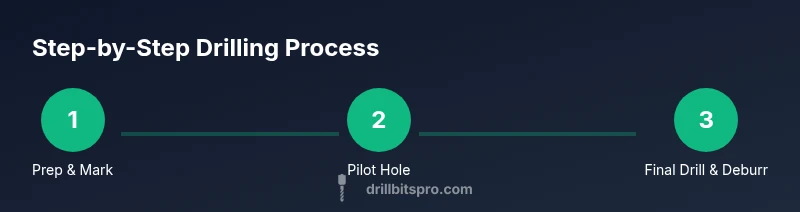
Step-by-step drilling workflow
A repeatable workflow anchors consistent results. Begin with prep and marking, then select the correct bit and set the appropriate speed. Drill a pilot hole to guide the final hole, advance to the final diameter in measured steps, and finish with deburring and inspection. Each action is described as a discrete step to promote focus and minimize errors. This approach applies across wood, metal, and masonry—adjust speeds and feeds to material properties, tool wear, and hole size.
Tips for accuracy and avoiding wander
Wander happens when starting points drift or bits aren’t aligned perpendicular to the surface. Use a center punch or transfer punch to create a precise starting guide, then begin at a slow speed with light pressure before increasing. Keep the drill aligned with the marked point and use a backer board when drilling through thin material to prevent tear-out. Lubricants or cutting oil for metal decrease heat and extend bit life, while a depth stop helps maintain consistent depth across multiple holes.
Finishing touches: deburr, clean and verification
After drilling, remove burrs with a deburring tool or fine sandpaper. Wipe away chips and dust, then verify the hole’s depth and diameter with a caliper or ruler. If dimensions aren’t met, reassess bit size, feed rate, or misalignment. Document adjustments for future projects. A clean, dimensionally correct hole improves fastener seating and overall project quality.
Troubleshooting and advanced tips for different materials
Wood requires sharp bits and careful backing to prevent splintering. Metal benefits from cutting oil and slow, steady feeds to manage heat. Masonry demands carbide-tipped bits and adequate hammer action for aggressive material. Always consult the material’s guidelines for speeds and feeds. For intricate holes, a drill guide or drill press can dramatically improve accuracy and reduce drift. The core idea: tailor your technique to the substrate while maintaining a safe, controlled operation.
Tools & Materials
- Drill (cordless or corded)(Ensure battery is charged or you have a stable power source.)
- Assorted drill bits (wood, metal, masonry)(Include pilot bits for metal and step bits for larger holes if needed.)
- Center punch(Creates a precise starting point to prevent wandering.)
- Clamps or a vise(Secure the workpiece firmly to prevent movement.)
- Pilot bit(Eases entry for larger final bits and improves accuracy.)
- Measuring tools (tape, square, caliper)(Verify placement, depth, and diameter.)
- Lubricant or cutting oil (for metal)(Reduces friction and cools the bit.)
- Deburring tool or sandpaper(Smooths edges for safety and fit.)
- Safety gear (eye protection, hearing protection, dust mask)(Protects against debris, noise, and dust.)
- Backer board or scrap material(Prevents tear-out for thin materials.)
Steps
Estimated time: 25-45 minutes
- 1
Prepare workspace and safety gear
Set up a sturdy, well-lit area. Secure the workpiece with clamps and confirm the drill battery is ready or the cord is secured. Put on safety glasses and hearing protection before starting. A clean, prepared space reduces accidents and helps you maintain control from the first drill bite.
Tip: Clamp firmly and maintain a stable stance to prevent kickback. - 2
Mark hole position and center punch
Mark the exact hole location with a pencil or marker, then strike a center punch to create a small dimple. This gives the bit a precise starting point and minimizes wandering, especially on smooth surfaces.
Tip: Double-check alignment with a square before punching. - 3
Choose bit and set appropriate speed
Select a bit suited to the material and hole size, then set the drill to an appropriate speed. Slower speeds and steady pressure reduce heat and wear, particularly in metal or masonry.
Tip: If unsure, start with a pilot hole for guidance. - 4
Drill a pilot hole
Drill a small pilot hole at the marked spot to guide the final hole. This step improves accuracy and reduces the chance of drift, especially on thicker materials.
Tip: Keep the drill perpendicular and apply light, steady pressure. - 5
Drill final hole with progressive sizing
Proceed to final hole diameter using the correct bit or incremental bits. Avoid forcing the bit—gradual advancement minimizes heat and maximizes accuracy.
Tip: Clear chips regularly to prevent binding. - 6
Deburr and inspect
Remove burrs with a deburring tool or sandpaper. Measure depth and diameter to confirm specs, and visually inspect for deviation or misalignment.
Tip: A quick check now prevents failed fasteners later.
Got Questions?
What drill bit should I use for metal?
Use high-speed steel (HSS) bits or cobalt bits for tougher metals. Lubricate with cutting oil and start with a pilot hole to reduce stress on the bit.
For metal, use HSS or cobalt bits and lubricate with cutting oil. Start with a pilot hole to ease the process.
Can I drill without a drill press?
A drill press improves accuracy for vertical alignment, but a handheld drill can work well with careful clamping and marking. For large or critical holes, use a guide or jig.
Yes, you can drill with a handheld drill if you clamp and mark carefully, though a drill press improves precision.
Should I use pilot holes for all materials?
Pilot holes help with alignment and reduce bit wandering in wood and metal. For masonry, use a starter bit and hammer action as appropriate.
Pilot holes help with alignment in wood and metal; masonry needs a starter with hammer action.
How do I prevent drill bit wander?
Center punches and careful marking prevent wandering. Start slowly and keep the bit perpendicular to the surface.
Center punches and starting slowly keep the bit from wandering and ensure perpendicular drilling.
What maintenance does a drill require?
Keep bits sharp, clean, and lubricated. Replace dull bits and inspect the chuck for wear periodically.
Keep bits sharp and clean; replace dull bits and check the chuck regularly.
Watch Video
Top Takeaways
- Prepare, mark, and secure before drilling.
- Choose the right bit and use proper speeds.
- Drill progressively and deburr for a clean finish.
- Verify dimensions and inspect for accuracy.