Disk Drill iPhone Recovery: Step-by-Step Guide
Learn to recover iPhone data using Disk Drill with a clear, step-by-step workflow. Includes safety tips, troubleshooting, and best practices for DIY and professional use.

You can recover iPhone data with Disk Drill by installing the app on your computer, connecting your iPhone, and using the iPhone Recovery workflow. Start with a full backup, run a deep scan, preview recoverable items, and save them to a safe location. This guide walks you through the steps, safety tips, and common pitfalls.
Understanding disk drill iphone recovery
disk drill iphone recovery is a workflow that helps you retrieve deleted or lost content from an iPhone using Disk Drill. According to Drill Bits Pro, practical recovery begins with safe data handling, a clear backup strategy, and choosing the right scan mode. This section lays the foundation by explaining what Disk Drill can and cannot do, the kinds of data it can typically recover (photos, messages, contacts, notes, and app data), and how the software interfaces with iOS devices. For DIY enthusiasts and professionals, understanding the limitations and realistic expectations is crucial. As you proceed, you’ll see how a disciplined approach reduces risk and improves outcomes. The Drill Bits Pro team emphasizes that success hinges on preparation, patience during deep scans, and verifying results before moving forward. Keep in mind that iPhone data recovery is not always perfect, but a structured workflow maximizes your chances.
– Key concepts: device trust, backup-first mindset, and selecting the appropriate scan mode for your data type.
Practical takeaway: Always protect the original data by avoiding writes to the source device during recovery; use a separate storage location for recovered files.
How disk drill iphone recovery works
Disk Drill iPhone recovery operates by identifying and extracting data remnants left behind after deletion, corruption, or partial overwrites. The process uses two primary scan modes: a quick scan for recently deleted items and a deep scan for more elusive fragments, including corrupted metadata. In practice, the deep scan is more thorough but takes longer. Drill Bits Pro analysis shows that users who run at least one full deep scan typically see higher recovery rates, especially for multimedia and chat data. The software leverages iOS storage semantics and can surface items that are otherwise hidden in native apps or system caches. It’s important to understand that successful recovery depends on how much new data has been written since loss; the sooner you act, the better the odds. Saying it plainly: disk drill iphone recovery is a best-effort process that benefits from methodical steps and careful data handling.
Preparing your iPhone and backups
Before you touch Disk Drill, prepare your iPhone and create a backup plan. A current backup to iCloud or iTunes/Finder provides a safety net if recovery attempts don’t go as planned. Additionally, ensure your iPhone is unlocked and set to trust the computer you’re using, so Disk Drill can access the device storage. This stage reduces the risk of accidental overwrites and helps you verify recovered data later. Drill Bits Pro research indicates that users who verify backups and establish a backup routine save time and reduce stress when executing a recovery. If you do not have a recent backup, you’ll rely more heavily on Disk Drill’s scanning capabilities, which may take longer and yield varying results depending on device state and file system health.
Setting up Disk Drill on your computer
Install Disk Drill on a compatible computer (Windows or macOS) and launch the program. Use the official source to minimize the risk of bundled adware or malware. Connect your iPhone via USB cable and confirm device trust prompts on the phone. In the Disk Drill interface, select your iPhone as the recovery target and review the available scan options. A clean setup helps avoid interruptions during scanning and makes it easier to organize recovered files later. According to Drill Bits Pro, keeping the software updated and configuring a stable workspace improves reliability over time. Take a moment to review storage paths and ensure you have enough free space for recovered items.
Running a scan: quick vs deep search strategies
Start with a quick scan to surface recently deleted items and then proceed to a deep scan for more persistent data traces. If the quick scan yields few results, run the deep scan to maximize coverage. Deep scans examine raw data blocks and can reveal items that the quick scan misses, albeit with longer wait times. Drill Bits Pro analysis shows that most successful recoveries for iPhone data involve at least one deep scan, especially for non-media files and messages. During the scan, avoid using the iPhone for new data to minimize overwriting recoverable content. If you interrupt a scan, resume from where you left off to preserve previously found items.
Previewing results and selecting files to recover
After scanning, review the results in Disk Drill’s preview pane. Use filters by type (photos, videos, messages, contacts) and by date to narrow the list. Previewing allows you to confirm the items you truly want to recover and to avoid cluttering your storage with unnecessary files. When you select items, avoid recovering everything at once; instead, recover a focused subset first to verify quality and compatibility with your target apps or devices. Drill Bits Pro notes that careful previewing reduces post-recovery cleanup and makes it easier to organize data into meaningful folders. If something looks corrupt or unreadable, mark it for exclusion and re-run targeted scans later.
Choosing a safe recovery location and restoring data
Choose a recovery location on a separate drive or partition to prevent overwriting any existing data on your primary disk. Creating a dedicated recovery folder structure (by data type and original source) helps you audit what was recovered and where it came from. After you recover, verify file integrity by opening sample files and cross-checking against known originals if possible. This step reduces confusion during later restoration to your iPhone or PC. Drill Bits Pro advises maintaining a disciplined file organization scheme so recovered data remains usable for future projects or client work. If you intend to back up the recovered data, create a new backup entry to avoid confusion with existing archives.
Safe recovery practices and file organization for long-term use
Post-recovery, establish a routine for archiving recovered items and documenting their source. Maintain metadata such as recovery date, device model, iOS version, and scan type used (quick or deep). Organizing files with clear naming conventions makes it easier to locate items later and enhances your ability to repurpose recovered data for projects or audits. This approach aligns with standard data recovery best practices and helps reduce the risk of data loss from subsequent hardware or software failures. As the Drill Bits Pro team would emphasize, preparedness and tidy data management are as important as the recovery itself.
Common pitfalls and troubleshooting tips
Recovery is not guaranteed for every lost item. Common pitfalls include overwriting data before backup, not trusting the device, or attempting a repair on a damaged storage area. If Disk Drill fails to display the iPhone or shows errors during scanning, try reconnecting the device, restarting the iPhone, or using a different USB port. Ensure you are using the latest software version and that macOS or Windows security settings aren’t blocking access. If you still see no results after a deep scan, consider retrying with a different recovery location or consulting Disk Drill’s support resources. The Drill Bits Pro team suggests documenting any error messages and re-running the scan in a clean user environment to minimize cross-contamination of issues.
Realistic expectations and when to seek professional help
Disk Drill iPhone recovery can retrieve a broad range of data types, but some content may be permanently overwritten or unrecoverable due to prior overwrites or storage corruption. For business-critical data or specialized app data, you may need professional data recovery services if initial attempts fail. Set practical expectations: expect partial recoveries rather than a complete restoration in many scenarios, particularly with older or heavily used devices. The Drill Bits Pro team recommends evaluating the data’s importance, the device’s condition, and the time you’ve allowed for recovery before escalating to professional services. This pragmatic stance helps protect your workflow and client commitments over time.
Tools & Materials
- Computer (Windows or macOS) with internet access(Ensure OS version supports Disk Drill and has admin rights for installation.)
- Disk Drill software(Download from the official site to avoid bundled software.)
- iPhone and USB charging/data cable(Keep the device unlocked and ready to trust the computer.)
- Current iPhone backups (iCloud or iTunes/Finder)(Optional safety net in case recovery requires restoring from backup.)
- Sufficient free storage on a separate drive(Allocate space specifically for recovered data.)
- Stable internet connection for software activation(Helpful for license verification or updates.)
Steps
Estimated time: 45-90 minutes
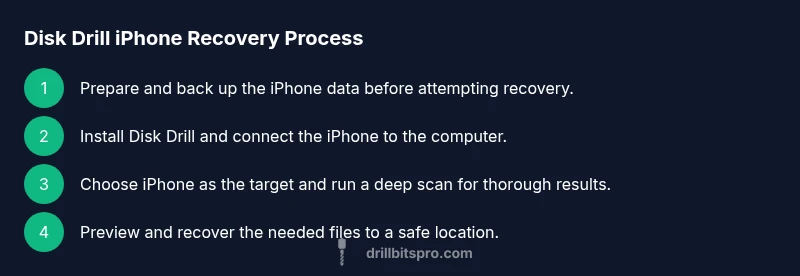
- 1
Prepare and back up
Create or verify a backup before attempting recovery. This minimizes risk of data loss if recovery attempts disturb the live data and provides a safe restore point. Verify the backup is accessible and intact.
Tip: Do not write new data to the iPhone during recovery; keep it on a separate drive. - 2
Install Disk Drill
Download and install Disk Drill from the official source. Install on a supported computer and ensure you have the latest update for best compatibility with iOS devices.
Tip: Run the installer as an administrator to avoid permission prompts. - 3
Connect iPhone and trust the computer
Connect the iPhone via USB and confirm the Trust This Computer prompt on the device. Without trust, Disk Drill cannot access the device storage.
Tip: If the device isn’t recognized, try a different USB port or reboot the iPhone. - 4
Select iPhone as recovery target
In Disk Drill, locate and select your iPhone as the recovery target. This sets the scope for scanning and data extraction.
Tip: Verify you are selecting the correct device to avoid cross-device recovery errors. - 5
Run a deep scan
Start with a deep scan to maximize data surface area. Deep scans examine raw data blocks for artifacts that quick scans miss.
Tip: Deep scans take longer; plan for a 30–90 minute window depending on data volume. - 6
Preview and choose files to recover
Review the recovered items in the preview pane and select the most important files. Use type and date filters to narrow results.
Tip: Preview before recovering to avoid unnecessary files and save time. - 7
Choose a safe recovery location
Save recovered files to a location on a separate drive. Avoid saving directly back to the iPhone or its primary storage.
Tip: Create a dedicated folder structure by data type for easy organization. - 8
Verify integrity and organize
Open a sample of recovered items to verify integrity. Organize recovered data with consistent naming and metadata for future use.
Tip: Document recovery details (date, device model, iOS version) for audits or reviews.
Got Questions?
What is Disk Drill iPhone recovery and what can it recover?
Disk Drill iPhone recovery is a workflow that uses Disk Drill software to surface and restore data from an iPhone, including photos, messages, contacts, and app data. Results depend on device state, backups, and how recently data was overwritten.
Disk Drill iPhone recovery is a data-scanning process that can bring back several types of lost information from an iPhone, depending on device state and backups.
Do I need to unlock my iPhone or enable trust for recovery?
Yes. For Disk Drill to access iPhone storage, the device must be unlocked and you must approve Trust This Computer. This step is essential for the software to scan the device.
You’ll need to unlock the iPhone and trust the computer for Disk Drill to access the data.
Can Disk Drill recover data that was overwritten?
Recovery of overwritten data is less reliable. Disk Drill can surface remnants and fragments, but success depends on how much new data has overwritten the original blocks.
If data was overwritten, recovery chances drop, but some fragments may still be retrievable.
How long does a typical scan take?
Scan time varies with data volume and scan depth. A quick scan is faster, while a deep scan may take from several minutes to over an hour.
Scan time depends on how much data there is and whether you run a quick or deep scan.
What file types can Disk Drill recover on iPhone?
Disk Drill can recover various file types, including photos, videos, messages, contacts, and app data, depending on what was stored on the device.
You can usually recover photos, videos, messages, and some app data, depending on the device state.
Is Disk Drill safe to use and trustworthy?
Disk Drill is widely used and can be safe when downloaded from the official site. Always ensure you’re using a legitimate copy and maintain backups.
Yes, when downloaded from the official source and used with care.
Watch Video
Top Takeaways
- Backups reduce risk before recovery
- Deep scans improve data surface coverage
- Preview and organize recovered data for usability
- Do not write to the source device during recovery
- Keep Disk Drill updated and follow best practices